Pie making is truly an art.
A ‘good’ pie tastes good and looks good. An utterly fantastic pie that makes your toes curl and moans escape your throat has so much more. Not only are the innards tasty and cooked/prepared to perfection, but they use fresh, seasonal ingredients, and are a combination of simplicity and some sort of unexpected ‘wow’ factor. The crust must be tender, yet flaky (even the bottom), a perfect light golden brown, and beautifully crafted. It should be so beautiful that you can’t bear to cut into it, but the tendrils of eau d’pie wafting towards your nostrils make it so that you MUST try it, and once you do, you want to devour the whole thing in one sitting, but devour it slowly, so as to appreciate all of these elements which make the pie so perfect.
I usually don’t have the energy, unless it is for a special occasion, to attempt to make a supremely fantastic pie. I usually settle for ‘damn good’. I constantly have people asking me to reveal my secrets of pie making… but here’s the thing. They aren’t secrets. I’m happy to share everything I know.
First, I will post a few pictures of what I think are some extraordinary pies, some made my me, and some not. Most of not all of the photos come from my family’s annual Pie Party, which is probably the best event in the world.
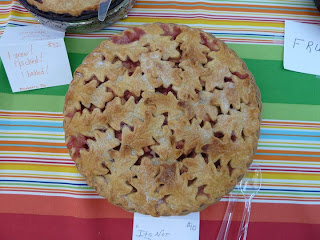
Anyone who knows her, will tell you, but Brookes Wolfe makes a killer pie, and she can make the most beautiful crusts imaginable. Not only does she have some gorgeous leaf action going on, but she has a rope edge on it, which is hard to do. I think the innards were trusty combo of apples and berries, which you can never go wrong with.
One of my pies. If I recall correctly, it was a lemon-lavender-raspberry pie with a berry and rosewater glaze, with a leaf crust edge and crystallized calendula flowers.
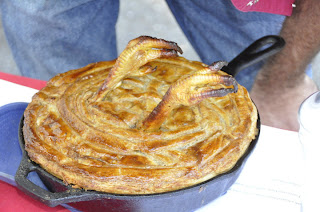
David the Baker’s ‘Upside down chicken pie’. It was a combination of beautiful and terrifying. From what I understand, it was delicious, even with the claws leering at you (I’m a vegetarian, so I didn’t try it). He butchered the chicken himself, made an interesting crust, and had extreme shock value to make this pie memorable.
A beautiful creation from my mom, Barbara Swell. You can probably see where I learned to do the leaves from! This was a roasted veggie pie, and it was a combo of beautiful and wonderfully tasty.
Another of my mom’s pies. while it might not be a show-stopper in appearance, it is by far the best thing I ever ever tasted in my entire life. It was a blackberry pie with a layer of dark chocolate on the bottom. When I ate it, I shouted out ‘OH MOMMA!’, and that’s what this kind of pie is called now. Holy crap, you can’t imagine how amazing this was. An unexpected twist on a traditional pie, that adds to the flavor, and makes it so incredible that you scream out for it when you sleep… that’s what I’m talking about.
Thanksgiving is coming up, and that means pumpkin pie for most folks. It’s not a show stopping pie, but it certainly goes into the ‘damn good’ category, especially when you make it will a real pumpkin, as opposed to the canned variety. I’ll start you off with a recipe for that (don’t worry, by the end of this post you’ll be able to make a stellar crust as well!). This page in my recipe book is covered with so many spills of all of the ingredients that the pages stick together and it’s hardly legible anymore. It’s that trusty of a pumpkin pie recipe. I swear by it. The difference between this and most other pumpkin pie recipes is that it only has one egg, so it is denser and not eggy.
Mrs. Painter’s Pumpkin Pie
from: The Lost Art of Pie Making Made Easy, by Barbara Swell
1 1/2 cup pumpkin puree
1 1/3 cup evaporated milk (I use whole milk and it’s just fine)
1 egg
3/4 cup brown sugar
pinch salt
1 Tbs. flour
1 tsp each cinnamon and ginger
dash of freshly grated nutmeg.
Mix all ingredients well, and pour into an unbaked pie shell. Bake in a 350 degree oven on the bottom rack for about 45 minutes or until the middle is firm. Cover the edges with foil if needed to keep from over-browning.”
You know when this is done when you wiggle it a big and the middle doesn’t slosh. This is one of those pies best eaten once it’s been cooled off, and preferably refrigerated. The crust has a tendency to finish before the insides, so pay close attention once you hit the 1/2 hour mark, remember that foil is your friend to keep crusts from burning!
Pumpkin pie I made yesterday cooling on the windowsill
Now, for the crust…
Many folks have fear of crust. And I don’t fault them for it, because a good pie crust is a tricky thing, and there are a lot of terrible crusts out there. But there are some fantastic ones out there as well, and that’s what I’m going to write about now. Some people like to make different types of crusts for different pies, but for most pies I use the same basic recipe, as it works well for just about everything. It’s how I learned to make it from my momma, the undisputed Queen of Pie, and it’s won me ‘best crust’ in the giant pie contest nearly every year.
First, a couple of things that will help you, before giving you the recipe:
1) Use good ingredients. That should be obvious, but if you use discount flour and discount butter, it’s not going to be good. If you want good pie, use good ingredients.
2) Keep your ingredients (especially butter) very very COLD. I can’t emphasize enough how important this is.
3) Work the dough as little as possible.
Ok, so now for your ingredients. This is enough for a 1 crust pie that fits in a 9″ pie pan. If you need a 2 crust pie, just double the recipe. I don’t measure exactly, as I eyeball it all, but this is theoretically what I am doing:
1 cup white, unbleached all purpose flour (King Arthur brand is reliable)
1/4 tsp salt
1/2 tsp sugar
very small amount of baking powder (little less than 1/4 tsp)
5 3/4 Tbs very cold unsalted butter
small bowl of ice water with a juice of half a lemon squeezed into it (you’ll use about 5 Tbs of this water)
Mix dry ingredients together. Some folks say sift, but to be honest, I’ve never sifted anything in my life and it all turns out just fine. Cut your butter into cubes (approx 1/2 inch), and using a pastry cutter, fork or tips (seriously! only the tips!) of your fingers cut in half of the butter, until it is like course crumbs. This step makes it tender. Then cut in the rest of the butter, until it is the size of small peas. That makes it flaky. Get your icy lemony water, and stir in the water one tablespoon at a time. Stir it with a fork, and it’s done when it BARELY holds together when you squeeze it. Don’t you dare make a wet dough, because it will be nasty if you do that. It will seem kind of dry, but as long as it barely sticks together, it’s fine. At this point there is an optional step, which I’m not sure if I can describe, and feel free to skip. There’s a French name for this technique, but I haven’t a clue how to spell it, just how to do it. I quickly form the dough into a ball (don’t touch it too much, you’ll melt the butter!), and then I put it on a slightly floured surface and using the heel of my hand, I push it down hard into the ball of dough and push it away. This helps with the flakiness. Then I form it into a flattened ball.
However, you can skip that if it seems too much, and you can go ahead and make your dough into a flattened ball. It shouldn’t be more than an inch thick. Wrap well in plastic wrap, and put it in the fridge. It needs to rest for an absolute minimum of a half an hour, but several hours or even overnight is ideal. The resting period of the dough in the refrigerator is important.
When you are ready, take out your dough, flour a surface, and get out your pie plate and rolling pin. When rolling out a pie crust, you want to roll in a way so that you are pushing out from the middle of the dough. I never ever bring my rolling pin to the edge of the dough, as it isn’t necessary, and will only screw you up. After ever roll or two, it’s good to pick up and rotate the dough a quarter of a turn, and make sure it’s not getting sticky from butter melting on the top or bottom. Don’t over-flour, as it will make your crust bitter, but flour enough it keep it from sticking. Roll until it is about 1 1/2 inches larger than the top of your pie pan all the way around.
Carefully lay your crust into your pie pan, so that it sets nicely in there. Use a knife to cut off the jagged bits over the edge, or the parts where it is too big. You want about an inch or a bit less of ‘over hang’. You are going to tuck this behind the crust, so that you have a nice rounded edge along the rim of the pie plate. Got it?
Now, to ‘pretty-fy’ it. There are a number of things to do, but I’ll tell you the simplest ways. If you are lazy or frightened, you can take a fork and gently press down the edges along the rim of the pie plate. I personally find this ugly, but some folks like it. OR you can do the following: With your right hand, hold out your thumb and first finger so that there is about a centimeter’s space between them, and hold out your first finger on your left hand so that it is pointing into the space between the fingers you are holding out on your right hand. Having your fingers out like this, go to your crust, with those right two fingers on the outside of the top edge, and your left finger on the inside. Bring these fingers together, so that your left finger basically pushes the dough into the little space created by your two fingers on your right hand. Then, do this to all of the pie. Voila, it is beautiful!
(image from http://localfoods.about.com)
At this point, I like to cover it with plastic wrap and let it refrigerate for another 15 minutes or so. If you will be blind baking, you need to poke holes in the bottom with a fork. Otherwise, use as the recipe says.
If any of this isn’t clear, let me know and I’ll try to clarify. If you know someone who is a good pie baker, it’s best to learn from them, as making pie is an art best learned from another. If not, try anyways and you can always ask me for advice!
As my mom wrote in her book that I reference above, “Pie has intrigue. Pie is adventure, mystery, romance, and love.” What more could you want in life than that?


Fatal error: Uncaught Error: Call to undefined function ereg() in /home/logcabincooking/public_html/appalachiantoalpine.com/wp-content/themes/canvas/includes/theme-comments.php:63 Stack trace: #0 /home/logcabincooking/public_html/appalachiantoalpine.com/wp-content/themes/canvas/includes/theme-comments.php(19): the_commenter_link() #1 /home/logcabincooking/public_html/appalachiantoalpine.com/wp-includes/class-walker-comment.php(174): custom_comment(Object(WP_Comment), Array, 1) #2 /home/logcabincooking/public_html/appalachiantoalpine.com/wp-includes/class-wp-walker.php(145): Walker_Comment->start_el('', Object(WP_Comment), 1, Array) #3 /home/logcabincooking/public_html/appalachiantoalpine.com/wp-includes/class-walker-comment.php(135): Walker->display_element(Object(WP_Comment), Array, '5', 0, Array, '') #4 /home/logcabincooking/public_html/appalachiantoalpine.com/wp-includes/class-wp-walker.php(370): Walker_Comment->display_element(Object(WP_Comment), Array, '5', 0, Array, '') #5 /home/logcabincooking/public_html/appalachi in /home/logcabincooking/public_html/appalachiantoalpine.com/wp-content/themes/canvas/includes/theme-comments.php on line 63